Monday 26 October 2009

Second Floor And Roof


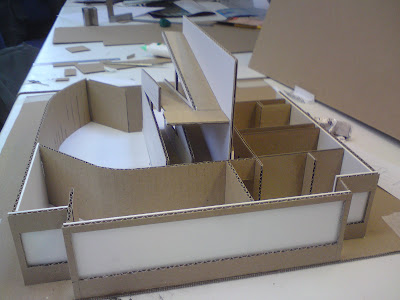
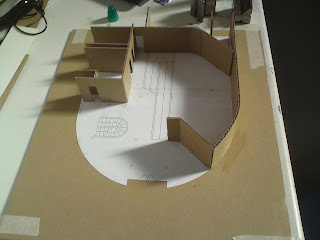
I have finally completed my sketch model of Villa Savoye. There are a few minor errors in measurement, which I have now corrected on Rhino. The sketch model took quite a while but it has definitely been worth making it as I have been able to check all errors and problems and solve them fairly easily. I have spent this weekend working out the majority of my laser drawings so that I will be able to start making this week. Also having this sketch model has given me a good idea on how I will display the model on the baseboard. Finally I have looked into lighting and will probably use simple baseboard lighting with drill holes in the bottom floor to create a spotlight effect.

Tomorrow I will be using the laser cutter to make sure that the staircase works and fits the model, also I will be looking into whether I will use expensive brass etching for window frames and railings or laser cut thin card/thin plastic. I will do experiments tomorrow to work this out.

Saturday 17 October 2009

Sketch Model: Interior/Exterior Ramp


Using a limited amount of drawings I had to determine the dimensions of the interior/exterior ramp. I had to change a few measurements to allow the ramp to fit into the model and began making the ramp from cardboard. I was slightly worried that it wouldnt fit as it has quite an unusual shape but it fit perfectly into the building. I had to make a few minor adjustments on the Rhino Drawings but I think it went well and I am confident that I will be able to make the ramp again in acrylic and wood for the final model with no problems.

Wednesday 14 October 2009

Sketch Model


This is a 1:50 sketch model of Villa Savoye that I started today. I printed out the plans to use as a base and cut out elevations from cardboard. I have done this to find any problems I have with the model or drawings and also so that I can figure out the baseboard and lighting plan.

Monday 12 October 2009

Ramp Drawing


This is the drawing from Section A-A but with minor adjustments to fit into my model. There is a slight problem with the floor heights but this will be changed now. I will need to lower the heights of the floors so that this drawing relates to all my other ones otherwise this ramp will not fit into my model. Once I have corrected the floor heights, I will be able to make a maquette of Villa Savoye out of foam board or card.

Friday 9 October 2009

Interior/Exterior Ramp


Using a through section drawing I have found a way to get the accurate dimensions used for the interior/exterior ramp. I will now create some detailed drawings in Rhino to give myself something precise to work from. I will update this blog when I have completed my drawings for the ramp and then I will move on to sorting out how the interior stairs will be made.

Thursday 8 October 2009

Elevations


North West Elevation


South West Elevation


North East Elevation


South East Elevation

Progress

I have now finalised all my exterior elevations and floor plates, which are ready to be laser cut. I have also completed the designs for the South East front window frame, which will be brass etched.
I will now be mostly focusing on the interior of the building, which includes the stair case, ramp, six garden walls and furniture. My biggest worry at the moment is the stairs and ramp, which I seem to have little information on. Im sure with the right drawings I will be able to work out the dimensions and add them to Rhino.

Im quite pleased with todays progress and I have finally decided the scale I will be building my model at, which is 1:50.

Length- 429.96 mm
Width- 384 mm
Height- 188.92 mm

Wednesday 7 October 2009

Floor Plates


I have decided to use my drawings from Rhino of the floor plates as a template for my model. Having the floor plates made from acrylic then cut out using the laser cutter. I will also use the cut line engrave setting to show guidelines for the walls, which will make it much easier to build this model. I used Adobe Illustrator to import the drawings from Rhino then used 255 Red for cut lines and 255 Blue for cut line engraves.

Tuesday 6 October 2009


Photos taken from:
http://architypes.net/place/villa-savoye

Digital Visualisation Video


Found this on youtube and found it rather interesting and useful.

Monday 5 October 2009

Villa Savoye

The last in a series of white houses designed by architect Le Corbusier, Villa Savoye was built as a weekend house for the Savoye family. The site was a large field surrounded by mature trees. Because one of the primary design goals was to leave the site as untouched as possible, the house was sited on the middle of this field. The automobile was a new thing at the time, and Le Corbusier put a lot of though into how the experience of arriving at the site by car would be integrated into the experience of the house. To understand this experience, imagine arriving at the site by car, passing through a thick stand of mature trees which then open up into the clearing, with the house in the middle. The driveway then leads under the house and around to the front door. In fact the radius of the curve of the ground floor leading to the entrance was determined by the turning radius of a car of the day. You would then get out of the car, protected under the house, and enter the front door.
The Savoyes lived in the house until 1940. During the second world war the house was occupied first by Gemans and then Allies, and seriously damaged. It came into possession of the town of Possy in 1958, which used it as a youth center and then considered demolishing it. However, after the protest of architects who felt it should be saved, and with support from Le Corbusier, the house was protected. In 1965 it became listed as a historic monument, and from 1985 through 1997 complete restoration work was perfomed. The restoration has included structural and surface repairs to the facades and terraces, rewiring, and installation of security cameras and lights. During this restoration, many of the original interior colors were restored. In situations where the original color could not be determined with enough certainty, the interior wall was painted white, the standard practice in restoring Le Corbusier buildings.

Taken from Architypes.net