Friday 11 December 2009

Project Deadline!


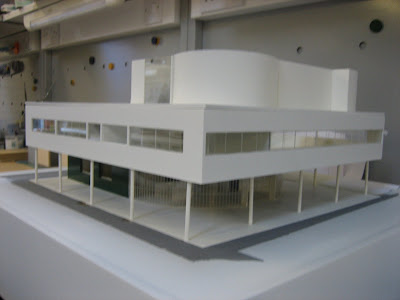
On the last week of my deadline, I had decided to spend all my hours in class assembling, filling, sanding and painting. This didnt go to plan. A lot of the week was spent on assembling and created little time for filling and sanding. I knew that I wouldnt be able to finish my model to the standards I wanted it. I decided it would be more inportant to have all my model painted for the deadline rather than it being filled and sanded without paint.
I give myself another week after the deadline to finalise my model. This will give me enough time to fill & sand, spray final coat, paint thick speckles for a grass effect on the baseboard. Also I will have time to stick all 4 separate parts of the model together. I will then be able to clean my model and produce a set of photographs for my portfolio.

Thursday 10 December 2009

Progress update!


I have now finished all floors and interior/exterior ramp. The 1st and roof top floors have come together without a single problem. I think this is due to my recent action plans and time management. With everything in place on my model I have left a few days to seal, sand and paint. I dont think I have left enough time for my finishing but I am going to put in as many hours as I can till the deadline. I do not think I will be able to finish the model to the standard I want it.
I will update with the final pictures and conclusion.

Wednesday 18 November 2009

Progress Update


Here is the lastest photos of my model of Villa Savoye. Here you can see my baseboard all masked up to reduce chances of scratchs and marks on the paint. I have now nearly finished assembling the ground floor. All I need to complete is the rounded glass walls at the front, the interior/exterior ramp that will give the model some structure and to put all windows in place. I have had a few set backs to painting, such as being given wrong thinners to mix with the paint. These thinners are yellow and have given some of my interior walls a shade of yellow. New thinners will be brought and I will have to respray it all including my baseboard.


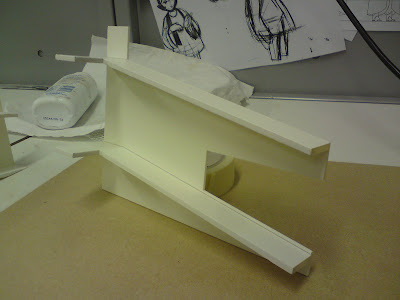
This is the Interior/Exterior ramp, which was going to be put into the final model but I came across quite a few problems. Certain dimentions were wrong, the ramp was constructed in the wrong way and the use of tensol was a bad choice. I got some more laser cuttings for the ramp done and began planning on how to build it again. Instead of having all seperate pieces painted then being stuck together, I have decided to split the ramp into two parts, assemble using dichlo (which shall give it a much cleaner finish) and then spray white.


I will have this completed by tomorrow ready to be put into the model. For now I will not permanently stick this in as there may be some minor adjustments later on in the project.

Tuesday 17 November 2009

Ramp Issues

The interior/exterior ramp has been causing quite a lot of problems within my build. I completed it yesterday but I have decided to make it again as it isnt up to scratch. I am going to remake the ramp but using a different process, instead of painting all seperate parts and then sticking together with tensol. I am going to laser cut all the acrylic and key using 400 grade wet and dry. Then I am going to assemble the two seperate parts with Dichlo and then spray them both. Once this is dry I will attach the two separate parts together. This will leave me with a much cleaner model. I also think it will fit together better by splitting the model into two separate parts that will be attached together after painting. I will attach pictures later this evening.

Tuesday 10 November 2009

Laser Cutting Issues

Today I began assembling the ground floor elevations. I noticed a problem with the laser cut acrylic windows. They are 0.4 - 0.6mm too small. The laser cutter's beam removes 0.4 - 0.5mm of material when it cuts. I will now have to experiment with a single window and using the offset tool to make the window 0.4 - 0.6mm bigger to see which one fits into the elevations.

Update!

The laser cutter takes off 0.3 and I have used the offset tool to make the windows 0.15 bigger. They now fit with a little bit of give so that they will still fit even when painted.

Monday 26 October 2009

Second Floor And Roof


I have finally completed my sketch model of Villa Savoye. There are a few minor errors in measurement, which I have now corrected on Rhino. The sketch model took quite a while but it has definitely been worth making it as I have been able to check all errors and problems and solve them fairly easily. I have spent this weekend working out the majority of my laser drawings so that I will be able to start making this week. Also having this sketch model has given me a good idea on how I will display the model on the baseboard. Finally I have looked into lighting and will probably use simple baseboard lighting with drill holes in the bottom floor to create a spotlight effect.
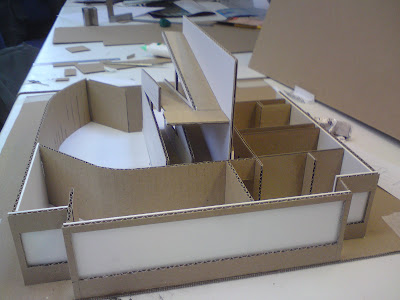
Tomorrow I will be using the laser cutter to make sure that the staircase works and fits the model, also I will be looking into whether I will use expensive brass etching for window frames and railings or laser cut thin card/thin plastic. I will do experiments tomorrow to work this out.

Saturday 17 October 2009

Sketch Model: Interior/Exterior Ramp


Using a limited amount of drawings I had to determine the dimensions of the interior/exterior ramp. I had to change a few measurements to allow the ramp to fit into the model and began making the ramp from cardboard. I was slightly worried that it wouldnt fit as it has quite an unusual shape but it fit perfectly into the building. I had to make a few minor adjustments on the Rhino Drawings but I think it went well and I am confident that I will be able to make the ramp again in acrylic and wood for the final model with no problems.